Hello everyone
I am pleased, excited, overwhelmed, that I have been asked to be a guest designer for BRUTUS MONROE. If you don't know this company yet you will love it. Christopher Alan is the creator/owner of the company. He is a very generous and compassionate person. He believes in customer service and loves his customers. With that being said he also has amazing products...
In todays post i will be working with his SPIRAL CLOUD background stamp from his current release. Brutus Monroe stamps are typically photopolymer. He does have red rubber as well. The point is they are made with the best materials.
I wanted to something simple with a positive message.....and a different technic!
In this photo you will see some of the products I used to make this card:
Brutus Monroe Spiral Cloud Background
https://www.brutusmonroe.com/products/spiral-cloud-4x6-backround-stamp?_pos=1&_sid=98591382a&_ss=r
Brutus Monroe Pearl Embossing Powder
I just checked and the site doesn't currently have the pearl embossing powder but the
Icicle Embossing powder will give you a similar effect, in fact may even be more amazing.
https://www.brutusmonroe.com/collections/clear-embossing/products/copy-of-ultra-fine-embossing-powder-icicle
I used a gray ink to stamp on the vellum.
Vellum
https://www.brutusmonroe.com/products/vellum-heat-resistant?_pos=2&_sid=fc4607179&_ss=r
I used a blue copic B01 but any alcohol marker will work
I used a specialty tool for shading, but you can use what every you have on hand like popcsical stick, a ball tool or a bone folder.
https://www.brutusmonroe.com/products/fold-and-score-tool?_pos=4&_sid=6d7ca493c&_ss=r
The misti stamping platform is an amazing tool to have in your craft tool supplies! I just have to say its very loved in mine. I used the original size but Brutus Monroe carries the mini! Which is also a fantastic tool just a little smaller.
https://www.brutusmonroe.com/products/mini-misti-1?_pos=24&_sid=ce0c66ce1&_ss=r
Papers I used were from Brutus Monroe
https://www.brutusmonroe.com/products/color-companion-glitter-stock-sterling?_pos=23&_sid=7435f414e&_ss=r
https://www.brutusmonroe.com/products/raven-cardstock-100lb-cover?_pos=1&_sid=edfbf8325&_ss=r
https://www.brutusmonroe.com/products/not-your-mamas-cardstock-heavyweight?_pos=2&_sid=6bea32ab9&_ss=r
the turquoise paper i thought was Brutus Monroe but I can't locate it. I think a gray cardstock would look great with this.
I raised the surface on part of the card with
https://www.brutusmonroe.com/products/copy-of-brutus-monroe-foam-tape-36-yards-108-feet-1-16-thick?variant=19963762114614
When cleaning my stamps i use squeaky clean....
https://www.brutusmonroe.com/products/squeaky-clean-stamp-cleaner?_pos=1&_sid=e8a41ad42&_ss=r
with a lint free cloth.
Up next I will show you some step by step photos:
 |
| I am powder dusting the vellum to stop static and any residual oils from touching it. This is done so you hopefully won't have embossing powder in places you didn't intend for it to be. |
 |
I used a gray ink to stamp. Add even pressure across the back of the stamp. If you feel you did not get a great coverage re ink and stamp again. Make sure your paper didn't move.
|
When stamping on vellum be aware of the fact the ink will stay wet longer. Which makes it perfect for me to emboss on. Once you are happy with the stamped image. Prepare your surface for embossing. I use paper coffee filters to catch the extra powder.
when applying heat to the paper move it around so you can avoid warping it.
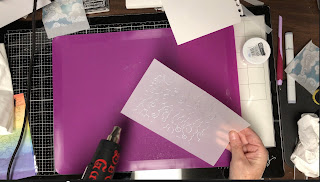
The embossed stamped image now has the silver look and not just a gray ink finish.
At this point the we turn the embossing side down onto the purple surface...which will allow me to create the effect I want. You can use other tools you might have in your craft supplies...such as a thin mouse pad or if you have a die cutting machine embossing mat that will work too.
I will use the blue B01 copic marker to color in around the clouds (please use the markers you have on hand if you don't have copies) try to stay on the outside of the clouds because you will see the color in the cloud. One other tip I would like to share is to test your marker on a scrap piece of vellum to make sure the color will be what you expect, it will be lighter on the front.
Now on to the vellum manipulation i will be using the shading tool but again use any rounded blunt tool that you won't tear the paper with.
 |
| These are examples of other tools you could use for the shading process |
 |
| Here I am showing you the cake decorating tool i have is capable of do the shading as well. |
Here i have the paper on a white scrap piece of paper so you can see better.
rub the paper inside the silver lining of the clouds with the working end of what ever tool you are using doing this will allow you to stretch the fibers of the vellum turning it white. It will also create a raised surface giving it dimension on the front of the paper. Like a puffy white cloud....see what i am doing here.
Here you can see the progress I am making with the tool. I am working the tops of the clouds right now. I will continue to work it until i work the bottoms of the inside of each cloud space.
A quick tip: if you put to much pressure on the vellum fibers at a time you will get some curling/warping of your paper....I am not completely worried about it beacause of the fact that I am covering the whole back of the paper with double sided adhesive and it will lay flat.
Here is the finished panel I am trying it on different colors of paper to see how i like it, and so you can see what it looks like.
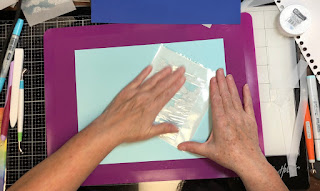
I cut down the panel to 3 3/4 in x 5 in and then ran it though it a xyron machine to apply double sided adhesive. Here i am rubbing the surface to make sure it is adhered well to the release paper with the adhesive on it. xyron or other double sided adhesives should work great so you don't visually see the glue on your finished product.
These papers are all from Brutus Monroe. I am going to end up going with the turquoise blue as one of my layers. I am going to use Brutus Monroe Raven card stock as 2nd card stock layer and the card base is made from NOT YOUR MAMA's card stock it is 130 lb wt.
In the next photo's I will show you the way i layer it.
 |
| here you can see on the Not your mama's card stock the gray ink i used on the clouds |
 |
now i am applying Brutus Monroe Clear embossing ink
So i can apply the Pearl embossing powder. This helps to pull the card together. |
 |
| Here I am mounting the 3 layers to the surface of the card base. |
Unfortunately I did not get photos of process of making the sentiment, that is ok though....
Basically I just cut a parts of other stamp sets apart to create it...and then mounted it on Brutus Monroe Glitter Card stock... this is the best in my opinion glitter card stock it doesn't shed, it cuts so beautiful and its sparkle factor is amazing.
I HOPE YOU HAVE AN AMAZING WEEK AND TRY SOMETHING NEW!
as Christopher says "Create Your Own Ending"
Thank you for reading all the way to the end! Heidi


